Tuesday 18 December 2012

99.999% complete


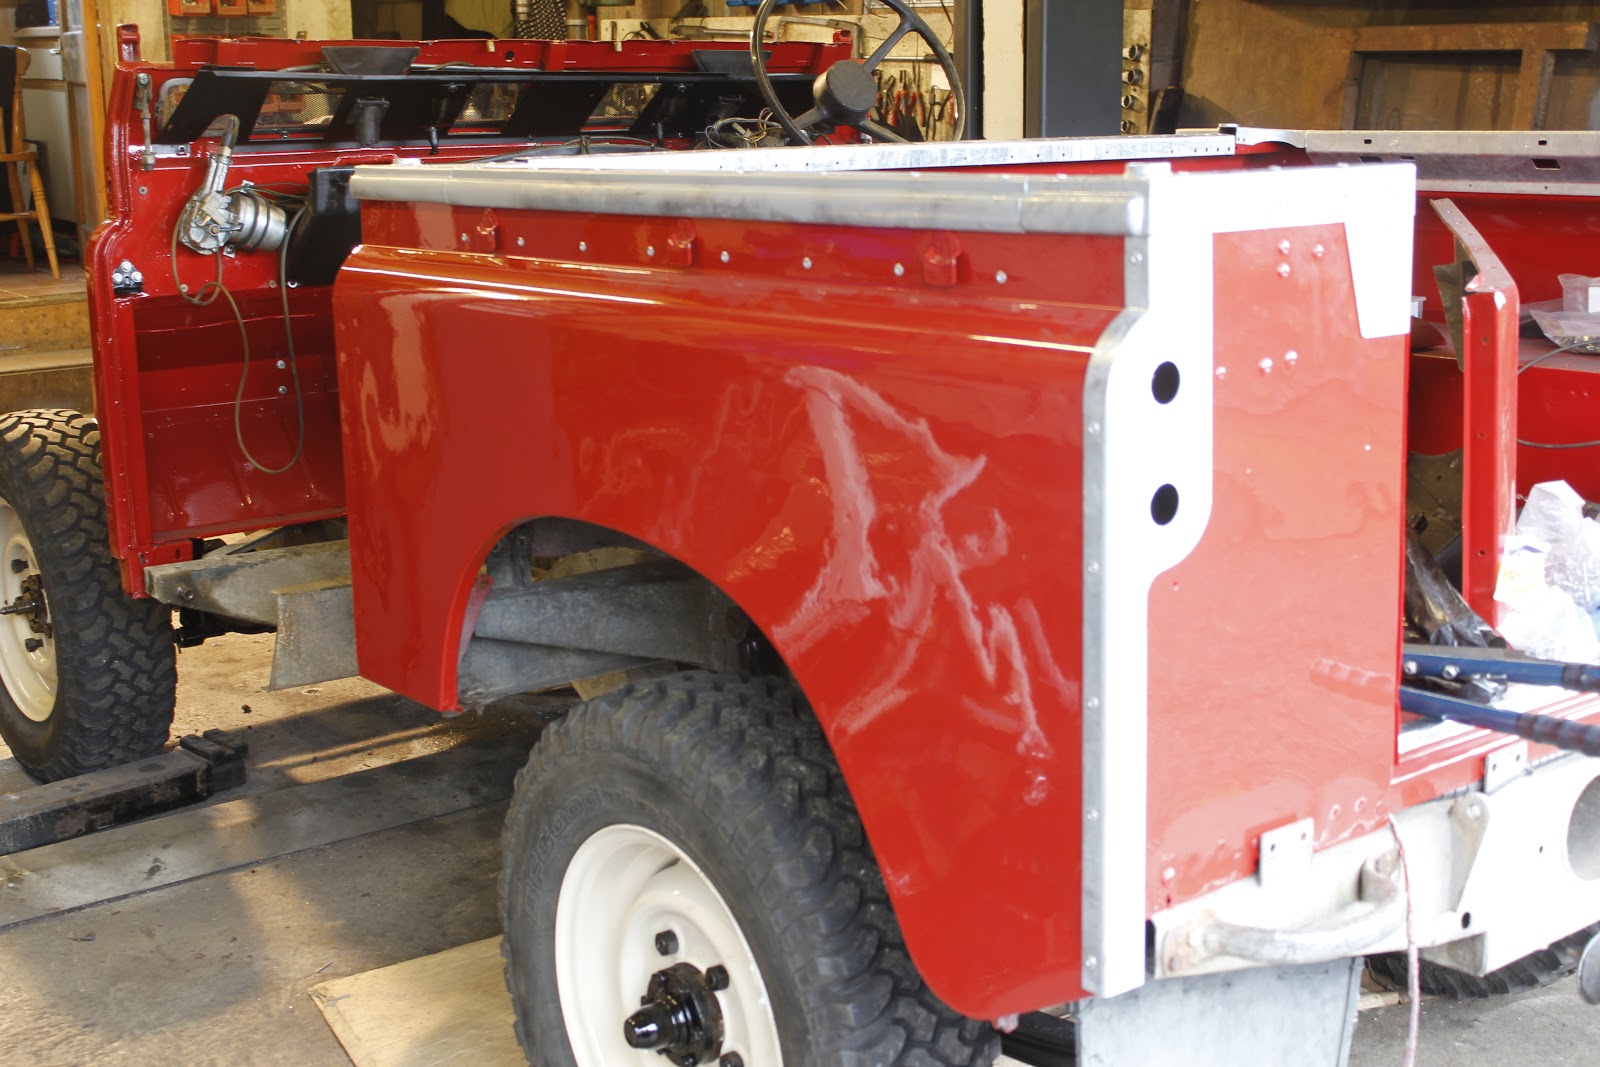
Here she is just about to head out the paint shop after the final rub up and finish off.
So much been happening since the last blog, lots of new interior parts including these new sets and 3 point inertia seat belts.
Roof on and all things shaping up ok. Have now done 30 miles in her and she drives great. a lot more suspension travel with the new parabolic springs, compared with the rusty old ones that came off its like new.
Will get some photos in the day light and get them uploaded asap. still things left to do to really finish her off.

Tuesday 11 December 2012

Fresh air and no rain


Thought after all these months in the garage the little s3 was due some fresh air,  98% complete i would say, just awaiting the arrival of the roof tomorrow and some new seats to fit today she really is taking shape. I just hope the Proud owner feels the same.

Friday 30 November 2012

Front End Build up

 Busy week so far, lots of rubbing things down and prepping for paint. here is the new galvanised front panel, just primed and ready for paint.


so after removing all my finger prints again i set about removing the scabby old front panel and get the shiny new one into place, easier said than done as everything is so adjustable.
After much checking and double checking and i even got the tape measure out at one point, but  i think it was worth it as its seems to look nice and even now...... phew, time for a cup of tea.....


 Really pleased with the way its shaping up,
will be great to get the glass in and well the  roof would be quite good to as i don't fancy my chances in this weather.......
Looking really like it should, couldn't bring my self to fit the old mesh front as it now looks really crap compared to the rest of it, may have  to invest in a new one just to finish it off and do it justice. Anyway its -6c so i think I'm going to have more tea....

Tuesday 27 November 2012

Let there be light

 So, firstly like to apologise for the lack of post on the blog over the last few weeks, don't worry though I've not had a mental breakdown or done a runner.
Loads of things been happening a lot of them sadly don't warrant pictures, like all the wiring and dashboard nightmare lol.
however we now have all the rear lights working and how they do look great.....

Pic 2 is the driver side door, which was again supplied by ashtree... great people who have been very helpful. the doors are made up from steel galvanised frames and marine spec aluminium skins. hope they last alot longer than original equipment anyway.

so this week we have the new front grill into paint along with the door tops and the rear sides, which are being painted red, not lime stone white (ok rod!!!)
will update with some painting pics tomorrow all in all should be finished in a couple of weeks... will be sad to see her go.


Wednesday 7 November 2012

Getting there

So lots been going on since the last post, as you can see, window panel is fitted up with its glass and looking really nice... picture really dosnt do its justice. also couldnt resist going for the old school number plates think it looks really nice with the red and silver..

so Tomorrow will get the free wheeling hubs fitted as they have been painted today along with the headlamp bessels..

Monday 29 October 2012

Bonnet and wings

 Another busy day at the office... working untill 5 then i got a call fom Iain to say that he had some pannels ready to pick up. so i got a loan of the new tonkatoy to go and collect as it has one of these great bed rug things which is great for protecting new pannels. My god though i lost the will to live by the time i got back, took over an hour to make the round trip . could have went to bloody edinburhg in that time, mind you i wouldnt have come back with theses great pannels though.


Couldnt resist this pic of the galvanised bonnet hinges and check out the shine on the paint...... its not even been polished yet.
 wink wink, one light in one to go.... really taking shape, need to get the new galv front pannel painted and fitted.....

Sunday 28 October 2012

Lights.... sort of

this is possably my favourate part of these kind of builds, you really start to breathe life into them and it transforms the look of the project. The boring bit now though is wiring them up


Riveting....

Would you actually imagine i went through over 100 rivets to fit these rear tub pieces. well worth it though its really starting to take shape. really like the way the paint looks at this angle 2

Now that's that time for tea..... bloody sore arms now working the riveter.also need to go and get the lights ready to fit and decide where to put the fog and reverse lights... awnsers on a post card... actually who does that anymore lol emails are good. its a shame photos really dont do the real thing justice, hope Neil will be more impressed with the real thing rather than the pics

Pole dancing debate


So much more important than the job in hand, rod and i try to decide wherther or not they will let us open the pole dancing club in clovenfords...... i think not. However 10 point to anyone who can guess what  we are looking at......................


Thats right its the steering column out of the willys jeep currently being restored by Rod, under my supervision of course lol

Wednesday 24 October 2012

Delivery has arrived............

pics to follow soon as thats all the final galv stuff here, so tub tops rear light surrounds and windscreen panel. cant wait to get riveting and then get some of the lights in so she starts to look like a s3 again........ watch this space...........................

Thursday 18 October 2012

Wheels and sand blasting

 Managed to get her outside today on her own steam, if nothing else to give the garage a good clean out. Couldnt resist getting a shot of the new wheels in the day light. really starting to take shape now......
 Got to the sand blasting unit today and got the locking hubs all blasted and ready to paint, will make such a difference as the chrome plating was all coming off them. was so much easier than sanding them down or wire brushing etc. think ill need to invest in one for the next project.....


Wednesday 17 October 2012

Engine parts

 Lots of different tasks today, air box painted plus the big bracket that holds it and the battery tray.


Here is part of the auto locking hub assembely, tomorrow ive got acsees to a sand blaster so im going to blast the hunb parts.Also a litte side projcet im doing is a 1960's paraffin traffic lamp which ill also sand blast tomorrow. Ill add pic of that once there is more to show.

Finally got round to doing some of the wiring 2. got the lower dash pannel in and ther ignition barrel wired up and got her to fire up, not for long though as there is no coolant at the moment.

Tuesday 16 October 2012

Refurbished Wheels

These reconditioned Wheels look great. Look how corroded they were before they went away.
So i decided to get the wheels sand blasted then powder coated, reason for this is because when i built my landrover about 2 or 3 years ago i got my own wheels done in the same way and there still like new with no corrosion or marks on them at all. actually thats a lie, there is a small scuff in the passangers wheel but that was very much pilot error

Thats the wheels fitted now and looking great, will add a pic of them one once ive rolled her out the garage, hopefully on her own steam.....

Monday 15 October 2012

Dashboard parts

 Here is the dashboard panel that holds the front vent handles and some of the switches, also on the drivers side it holds the instrument pannel . Was quite surprised to find it in such poor condition.
I think its because of all the holes in the bulkhead and how saturated the carpets were when i picked it up.
Here's the pannel basking in the sun after being primed 

 Now That the paint is on and dryed i fitted it back to the car. In between waiting for paint to dry etc i managed to get the wiper motor fitted and the mesh vents for the front vent panels.
Its takes bloody ages to file out holes once there full of galv, primer and paint.
Starting to take shape now, next is to tackle the wiring and the instument panel. Need to Clean up the speedo and the gauges also.

Sunday 14 October 2012

Before.. Reminder

Just a little reminder of how she looked before i started.... just in case anyone forgot......


Pedal boxes


Back at the Bat cave, my high spec state of the art painting jig gets put into action to paint the pedal boxes. was loving how well the clutch master clyinder has come up after its overhaul. there was an unbelievable amount of grey shit came out of it and also the brake cylinder. the brakes and the cluch will be like new when i get the fluid in.
Hope someone is keeping track of all these nuts and bolts that are new... need to book them out or the stock take will be all to cock lol

Mounting brackets

Thanks again to www.ashteelandrover.com for the nice galvanised mounting brackets they chucked in with the bulkhead

Steering


Steering column mounted back in.
before i fitted it i took that end plate off for a nose inside plus it was leaking slightly, sadly dont have a pick but its a pretty cool worm gear set up in there. proper old skool stuff.
you'll also notice all the wiring hanging about... thats going to be fun plugging it back in.

Although on a modern car there are a lot  more wires, to some extent its a bit easier to remove an instrument binicale as the wires are on a series of multiplugs which are all colour coded and different shapes, so you almost cant get it wrong. On the landrover all the wires are seperate and a lot of them are the same colour and length. This actually make it more time consuming as ive had to mark all the wires so i know where they go....

Rod Barry.....

just out of shot is a ramp and a landrover about to jump over him

Getting there.. Cup of tea well deserved


Here we are back at the Bat cave, tub ploped on and bulkhead fitted in place.  needed to get a lift on from Gator as i really didnt want to scratch either item as it was so painfully slow to get them up to the standard weve got. took a bit of fileing out the bulkhead holes as they were full of galv and paint.